

Getting Started With .Net MAUI
A Beginner's Guide To .NET MAUI

The .NET Multi-platform APP UI (MAUI), a cross-platform framework for developing native mobile and desktop apps, is introduced in this tutorial as a general overview of how to get started.
What is .Net Maui?
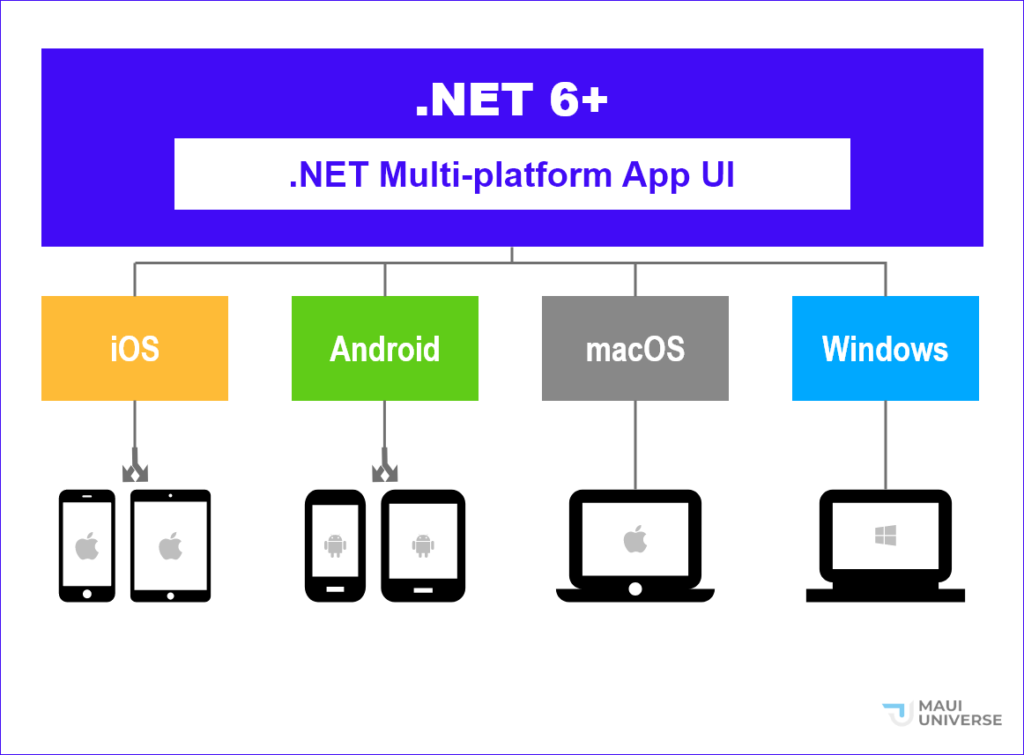
.NET MAUI or MAUI is a multi-platform framework for native desktop and mobile applications. Using a single shared source code, developers can create apps that operate on Android, iOS, Windows, and macOS using MAUI.
MAUI is an evolution of Microsoft’s discontinued Xamarin project, designed for the cross-platform development of mobile applications for Android and iOS platforms.
Multi-platform App UI, or MAUI, is an acronym that clarifies what it stands for and what it was designed to do.
How do I get started with .Net MAUI?
Now that you have a basic understanding of what .Net MAUI is all about and what it was designed to do, let us look at how to get started building a cross-platform application using .Net MAUI.

In this section, we will look at:
- Setting up your development environment
- Creating your first .Net Maui Application
- Structure of a .Net Maui Project
- Running the project
Setting up your development environment
To develop cross-platform applications using .Net MAUI, it is recommended to install Visual Studio 2022 to get the full support available in this version of Visual Studio. You can use the community edition of Visual Studio 2022, however, you can opt-in for other professional versions if you have a license or you are willing to get one.
Once you have successfully downloaded Visual Studio 2022, launch the installer and install the following workloads.
- .Net Multi-platform App UI development
- Universal Windows Platform development (make sure to expand the installation details to add SDKs of previous versions of Windows if you have plans to target those versions)

Now that the installation is successful, you are set to begin developing cross-platform applications with .Net MAUI.
Creating your first .Net Maui Application
You can create a new .NET MAUI application from Visual Studio or the command line. We will use Visual Studio to create a new project.
- Open Visual Studio 2022.
- Select the Create a new project button.

- In the Create a new project window, select MAUI from the All project types drop-down or search for MAUI in the search bar, then select the .NET MAUI App template, and then select the Next button
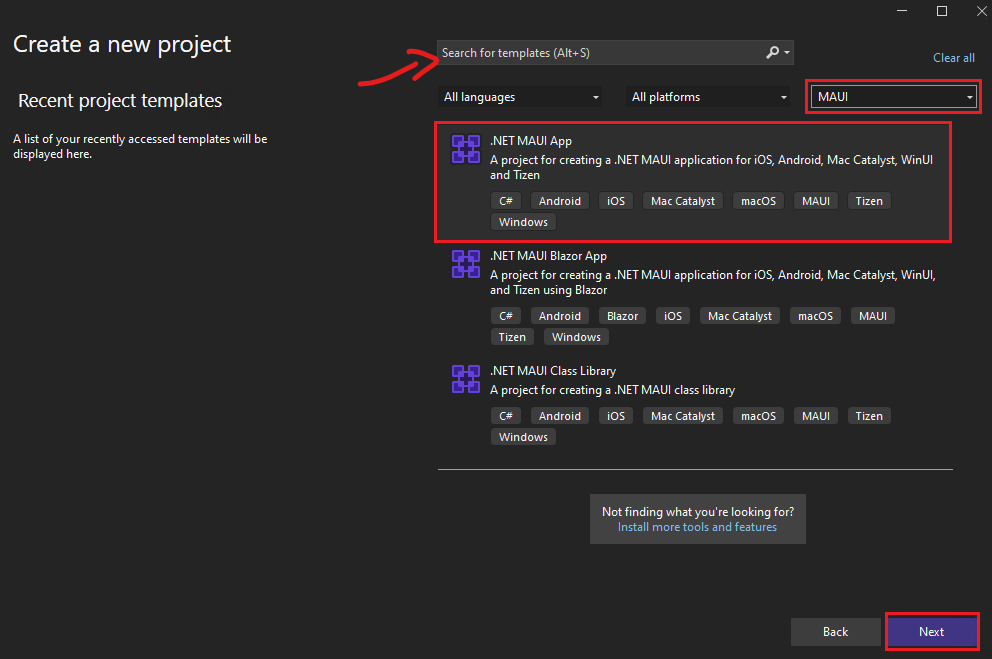
- Now it’s time to give your project a name. Enter DemoMauiApp as the project name and select the Next button

- In the Additional information window, select .NET 6.0 (Long Term Support) in the Framework drop-down. You can use any framework from .Net 6.0+, however, we will use .Net 6.0 in this case. Once this is done, select Create.

Now that you have successfully created a new .Net MAUI project, it is time to explore the structure of the project.
Structure of a .Net Maui Project
The structure of a .Net Maui project is different from the deprecated Xamarin Project. Microsoft has made effort to combine all projects into a single one that can be built and deployed across all platforms.

From the project structure, there are three important things to take note; the Platforms folder, Resources folder and the MauiProgram.cs file.
Platforms folder – This folder contains sub-folders for the supported platforms in your .Net Maui application. These sub-folders (Android, iOS, MacCatalyst, Tizen and Windows) contain platform-specific files.Use these sub-folders to add platform-specific implementations for your project.
Resources folder – This folder is shared among all the platforms and consist of sub-folders such as:
- AppIcon folder contains your application Icon
- The fonts folder contains font assets. The default is OpenSans font, however, you can add and configure your custom fonts.
- Images folder will house all your image assets
- The Raw folder will house your raw assets such as .mp4, .json, .txt, etc
- The splash folder contains assets for your splash screen
- Styles folder will house your colors, styles and themes.
MauiProgram.cs – This is an important file that helps with the configuration of your .Net Maui application. You can configure things like fonts and dependency injection in this file.
Running the project
Now, it is time to run the project to see your first application in action. Click on the Run icon at the top bar of your visual studio to run the application. We will run the Windows version of this project to see the result. Follow this instruction to setup your Android emulator in order to run the Android version.

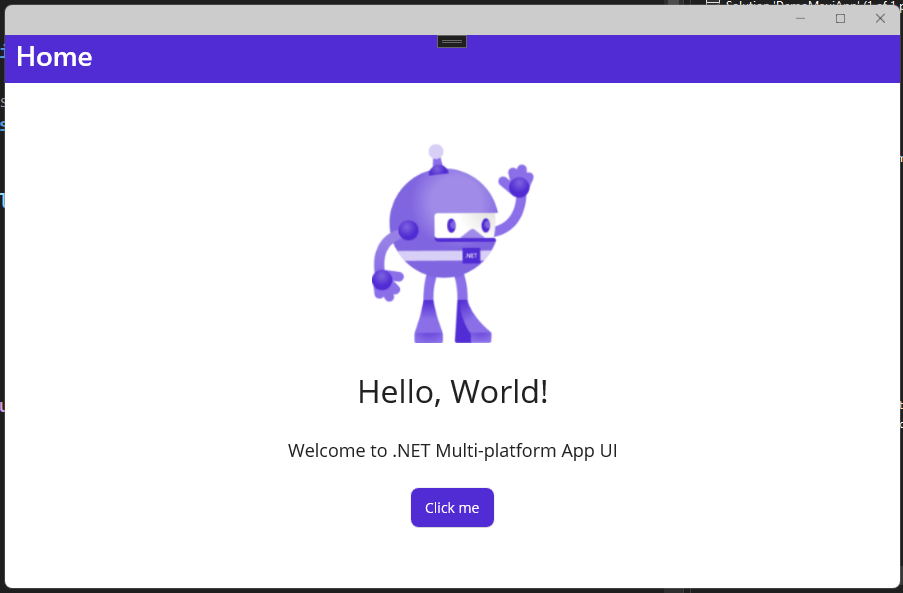
Hurray! You have successfully created your first .Net Maui Application.


